Mullet Fishing: Custom Floats


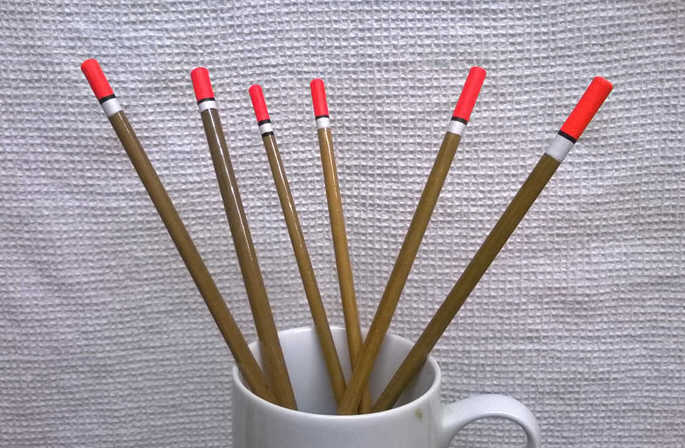
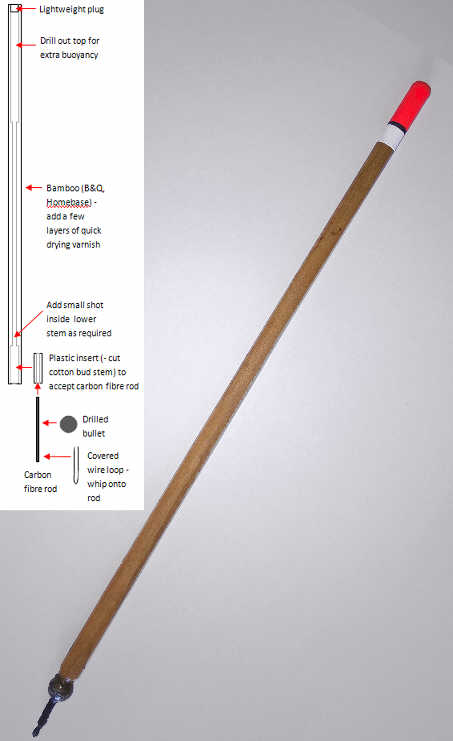
Not entirely content with some of the kit available over the counter, I can't resist the urge to tinker with stuff, in an attempt to make it 'work better'. Some of the augmentations I've introduced have a real practical worth, and some have been made, with the benefit of hindsight, for my own amusement. If I were to select the best and 'saddest', I would start with cheap, expendable and robust home made floats.

A recurring problem is the breakage of floats, especially around pontoons and other obstacles, known to the enlightened as 'The Curse of Drennan'. Theirs are for the most part excellent floats to use - they cast well, sit well, have good balance, and... break incredibly easily. The part that usually breaks (or just falls out) is that with the weight (if any) and ring, and you will often watch helplessly as the other useful bit floats off down the river, or remains perfectly cocked in the exact place you wanted to cast, but with no line attached to it. There are two solutions:

a) a drill out the stem at the base of the float, insert a short section of carbon fibre rod (cheap - 1mm, 1.5mm etc) and lash on a new eye, or

b) make custom floats, as described below; the end result may not cast as cleanly as a Drennan weighted peacock waggler, as the weight is more evenly distributed, but it shouldn't totally 'fail', is easily repaired even when significant damage is incurred, and usually causes less disturbance when striking the water


An update for 2018: this method applies equally to floats made from peacock quills and reeds - the balance, casting and weight-carrying properties of both of those are a significant improvement over the cane floats described here, although neither is nearly so robust.

An update for 2018: this method applies equally to floats made from peacock quills and reeds - the balance, casting and weight-carrying properties of both of those are a significant improvement over the cane floats described here, although neither is nearly so robust.


The raw materials are as follows, all readily available from the 'net, if not locally:

  • bamboo pea sticks from (say) B&Q / Homebase at around £4 per sheaf - pick the straightest, with plenty of thin segments, and these will produce a lot of floats
  • carbon fibre rod - 1mm / 1.5mm maybe (250mm lengths x2 in a pack at about £1.50)
  • quick drying varnish - Plasti-Kote 'clear' is a good option
  • acrylic white, black and fluorescent paint, also 'hardcoat', all available from model shops / online, but beware postage rates which often exceed the cost of the items
  • plastic coated garden wire or corrosion-proof alternative
  • drilled bullets or olivettes - 1g / 1.5g / 2g
  • small split shot or panel pins / small nails (NB the latter will expand if they rust)
  • cotton / whipping silk
  • superglue; the 'gel' type can often work better
  • a thicker waterproof glue also, maybe 'pipe repair' or similar
  • small saw or suitable knife
  • optionally, modeller's drill or normal power drill
  • deep vase, bucket or large 'fizzy drink' bottle - cut just the top off the latter, leaving it as tall as possible


The method, resulting in something like a conventional pre-loaded waggler:


  • cut the bamboo sticks slightly over the desired length, in the order of (say) 8 or 9 inches
  • optionally, drill out the top end to create a larger airspace, or to accept an insert / finer tip - this adds buoyancy to the tip
  • drill out the bottom end to accommodate split shot / ballast
  • varnish with at least one coat so it doesn't take on too much water in subsequent 'sea trials'
  • cut a short length of carbon fibre rod (2.5-3.5cm?) and glue on a drilled bullet at its mid-point, or use a temporary fix, in case the bullet is found to be too much / too little load
  • lash an eye made from folded garden wire onto one of the protruding ends of the carbon rod
  • pad out the other protruding end, either with whipping and / or (say) plastic from a cut Q-tip, to tightly fit the base of the float body
  • wedge the assembly in place for the moment, for testing how the float sits in the water
  • contrive a weight to attach which equals that of any swivels, shot and hooks that you typically use, plus the largest bait that you want the float to carry
  • try out the float in whatever suitable 'water tank' is available; always adjust the float to sit slightly higher in the water than what's ultimately required, as the addition of paint and varnish etc. will have an effect, further down the line
  • add small split shot or panel pins inside the lower float body and repeat, until the float behaviour is close to what's required - again, if panel pins are used, they may expand when rusty, which may ultimately compromise the float, although unlikely
  • squirt some thick glue in after the ballast, to avoid it rattling in use - the glue itself will add to the ballast to a degree, so use only what's necessary
  • mark the water level and also the point which is to become the top of the float; after any excess has been cut off, try the water bath test again and adjust as needed - each loss of mass will affect the float's 'ride height'
  • in the event of a disaster, if too much (but not an excessive 'too much') is cut off, an insert can always be added
  • after adjustments, once the float sits as required, block the top end with something small and light - polystyrene / foam, or a blob of waterproof glue, maybe
  • glue in the weight / eye assembly; using enough gel-like glue will ensure a watertight seal, also
  • seal up the cut ends of the bamboo, possibly with varnish or 'hardcoat', as these will more readily take up water than the undamaged cane
  • seal around the insertion point of the weight / eye assembly
  • apply a few more coats of varnish
  • paint the whole tip white, down to the waterline; this will enhance the performance of any fluorescent paint added next
  • add to the tip whatever fluorescent paint suits best, with or without a black bounding line (which in some circumstances and light conditions can help to show up small float movements)


NB there may be a buoyancy difference in salt water vs. fresh, more noticeable with very fine float tips

If all of that sounds complicated, it should not seem so after a few tryouts and some inevitable mistakes, plus a bit of cursing and throwing stuff...

Anyway, what's the worse that can happen? .... and try to remember there are no prizes for super-gluing your finger to your eyeball...

I used some of these floats for much of the 2014 and 2015 seasons for close / mid-range opportunities where obstacles were a factor (or not), and they survived all punishments, with just an occasional touch-up to the varnish and coloured tip.


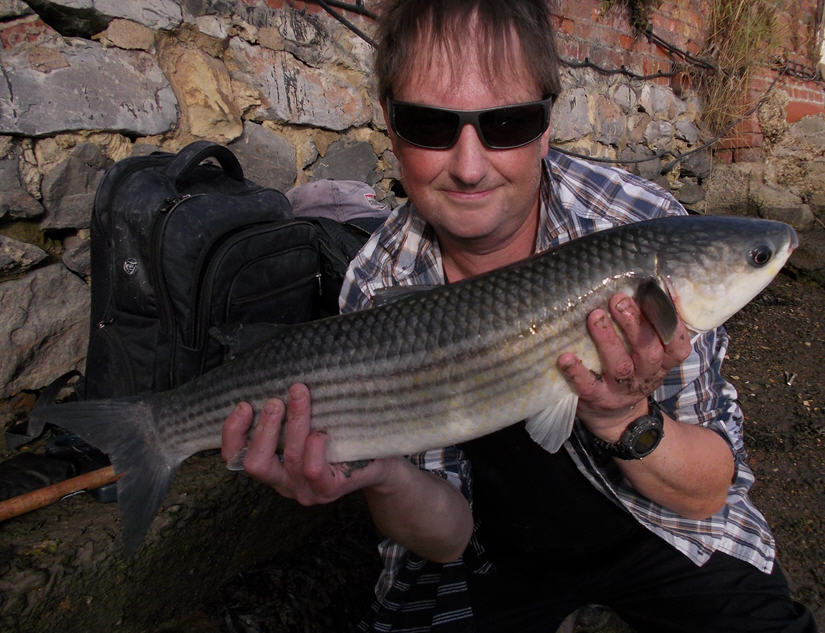
And finally, the best bit - the photo pages from 2014 onwards include loads of mullet captured using one of the above floats, often visible in the photos of fish lying on the landing net; this one weighed in at 6/08:


Last updated 24.12.21